How to Run Stable Diffusion AI on Mac and Windows

Do you want to create generative images from text using Stable Diffusion AI (SD AI)? This article is the easiest ever step-by-step guide to accomplish this.
Creating outstanding images for blogs, videos, websites, and apps should be inexpensive and quick when artificial intelligence (AI) is flourishing. You no longer need to come from a visual design or creative background to generate stunning images that will attract readers, web traffic, or app users.
The AI image generation technique can also make your web apps and mobile apps that deal with graphic design and editing more efficient.
Keep reading to explore convenient ways to run the most popular generative image AI, Stable Diffusion AI, on your Mac and PC.
What Is Stable Diffusion AI?
Stable Diffusion AI is a cutting-edge AI model dealing with image processing. It takes text as a prompt and generates images based on various diffusion models. It utilizes a diffusion process to produce images iteratively.
Unlike other generative image AIs, Stable Diffusion does not generate images in one go from training distributions. Instead, it employs a step-by-step diffusion process to gradually refine the image in successive attempts.
If you ever needed to use AI tools like MidJourney, DALL-E, Contrastive Language-Image Pre-Training (CLIP), Playground AI, etc., then you will love Stable Diffusion. It lets you create imaginary images from scratch. The resulting images are of standard quality so that you can use them on websites, apps, and marketing materials.
Reasons to Run Stable Diffusion AI Locally
Stable Diffusion AI is an open-source AI tool. So, anyone can get its checkpoint or AI training model from public repositories and generate AI images on their own. There are two ways to use this generative image AI tool:
- Use online apps that are costly
- Run locally on a PC or Mac and save money
Here are the reasons to run Stable Diffusion AI on your own system:
- You retain complete creative content ownership. No need to credit any tools or organizations.
- Create thousands of images for commercial or personal purposes without paying a penny.
- Avoid the need to subscribe to expensive online generative image AI tools.
- Use hundreds of settings to modify the final image the way you want.
- Generate AI images offline; no internet is needed.
Perhaps the most important reason to run SD AI locally is the ability to modify the training model and output. For example, you can use the following settings:

- Image upscaling
- Interrogate options
- Face Restoration
- Custom AI model training
- Sampler parameters
- Text to image
- Image to image
- Checkpoint merger
- Image resolution, width, height, etc., fine-tuning
Now that you know more about SD AI and the rationale to run it locally, find below the instructions to run it on a Windows PC and Mac:
How to Run Stable Diffusion AI on Windows
The simple workflow to run SD AI on your PC is to install the necessary software packages on the PC. Then, you need to get the latest checkpoint or AI training model from a public repository.
After you get the checkpoint, merge it with a graphical user interface for Stable Diffusion and get started with image production. Here is a step-by-step outline of the whole process. Follow along to become successful in running SD AI on the first attempt.
PC Requirements
Since generative image AIs rely heavily on the hardware configuration of your PC to perform millions of calculations it makes, you must use a high-performance PC for this purpose. Your PC must contain the following hardware spec to run SD AI smoothly:

- Windows 8 or Windows 10, or Windows 11
- Multi-core processors (64-bit) like Intel Core i7 12th gen or better
- 16 GB or more DDR4 or DDR5 RAM
- NVMe SSD for faster code execution on the local drive
- Dedicated GPU from NVIDIA or Radeon with 8GB VRAM or more
- 4 GB VRAM will also work, but you may experience slower processing speeds
- Internet connection to update software packages frequently
- An efficient CPU cooling system since the generative image processing or enhancement via AI are exhaustive processes that generate a lot of heat
Download and Install Git
First off, you need to download and install the Git version control system for your PC. Here’s how:
- Go to the Git Download for Windows portal.
- Click the 64-bit Git for Windows Setup button to download the setup file.

- Go to the download location on the PC and double-click the Git-2.41.0-64-bit file.
- Click Run and then keep clicking Next for all the dialog boxes.
- Let the software install on its own.
- Click Finish when the installation is complete.

Download and Install Python
Stable Diffusion uses various Python libraries to run its AI models, perform complex math, and so on. Therefore, you need to install the latest Python software package on your PC. Follow these steps:
- Visit the Python Windows download portal.
- Click the Download Python 3.XX.X button.
- Once the download completes, go to the directory where you downloaded Python.
- Double-click the installer and checkmark the Add Python.exe to PATH checkbox.
- Click Install Now.

- Close the installer once done.
Clone Stable Diffusion WebUI to PC
To run SD AI on the PC, you need a graphical user interface. This makes image generation easier. You do not need to remember complex Python commands to generate text to image, image to image, modify AI model settings, etc.
Firstly, you need to create a directory on your local hard drive where you need to import the Stable Diffusion WebUI from GitHub. This directory will also host all the SD AI checkpoints or training models. So go to any drive on your PC, right-click, and choose the New Folder option. Rename the folder to StableDiffusionAI.

Now, you are ready to clone the SD AI webUI in this folder using a Git client and a GitHub repo. Follow these steps:
- On the StableDiffusionAI directory, right-click and choose Git-Bash Here on the context menu.

- This will open the Git client command line interface.
- Now, go to AUTOMATIC1111/stable-diffusion-webui on GitHub and click the Code button.
- On the Code context menu, click the Local tab and click the copy to clipboard icon below the HTTPS tab.

So far, you have successfully copied the URL of the SD AI webUI. Now, find below the steps to clone it on your PC using the Git client.
- Go to the Git-Bash CLI on the StableDiffusionAI directory.
- Copy and paste the following code:
git clone <a href="https://github.com/AUTOMATIC1111/stable-diffusion-webui.git" target="_blank" rel="noopener">https://github.com/AUTOMATIC1111/stable-diffusion-webui.git</a>
- Hit Enter, and the Git client will start importing SD AI webUI components in the selected directory.
You have successfully created the files needed to run Stable Diffusion AI using a graphical user interface.
Download AI Models or Checkpoints
Now, you need to get the latest Stable Diffusion AI training model or checkpoint.
- Visit the Stable Diffusion AI original checkpoint portal on Hugging Face.
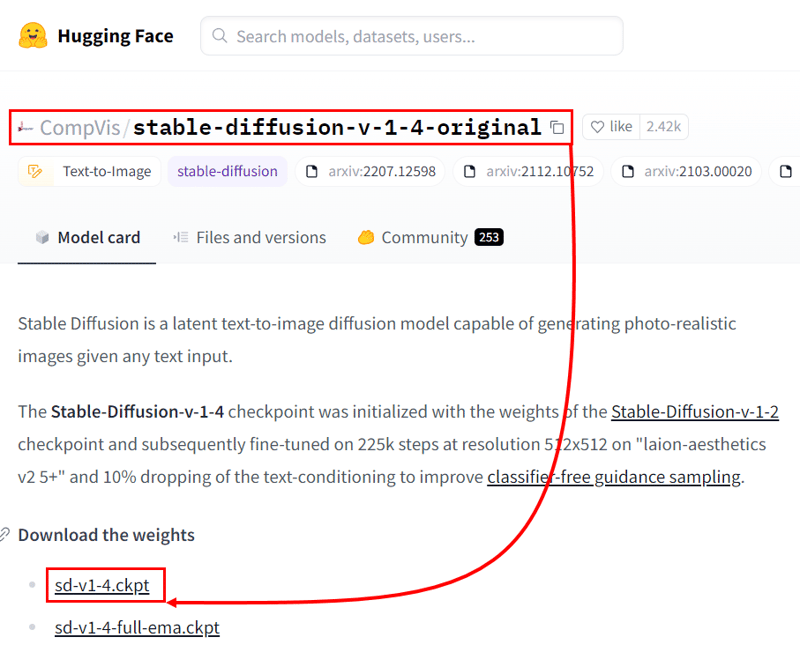
- Scroll down to the Download the weights section.
- There, you should see the following files:
- sd-v1-4.ckpt
- sd-v1-4-full-ema.ckpt
- Click sd-v1-4.ckpt, and the file download will begin instantly.
- It will take a while because the model is 4 GB in size.
- Go to the download directory once it is complete.
- Copy the sd-v1-4 file and paste it inside the following directory:
StableDiffusionAI > stable-diffusion-webui > models\Stable-diffusion
So far, you have primed your PC to run the Stable Diffusion AI locally. Just follow the steps below to get the webUI to run the actual AI program.
Run Stable Diffusion AI
Follow these steps to use the SD AI webUI to produce generative images using diffusion models:
- Go to the StableDiffusionAI folder.
- Find the webui-user.bat file and right-click on it.
- Click Edit to open the batch file in a Notepad.
- On the Notepad file, add the following code above @echo off:
git pull- Click the File menu on the toolbar and choose Save.

- Now, double-click the webui-user.bat file to open a command line interface.
- The webUI will now download PyTorch, a deep learning framework for machine learning purposes.

- Wait until this pre-processing step completes.
- When you see the following text in the CLI, the process is complete:

- Now, scroll the CLI up to the section where you see Running on local URL: text.
- Copy the IP address next to it and paste it onto the address bar of your web browser.
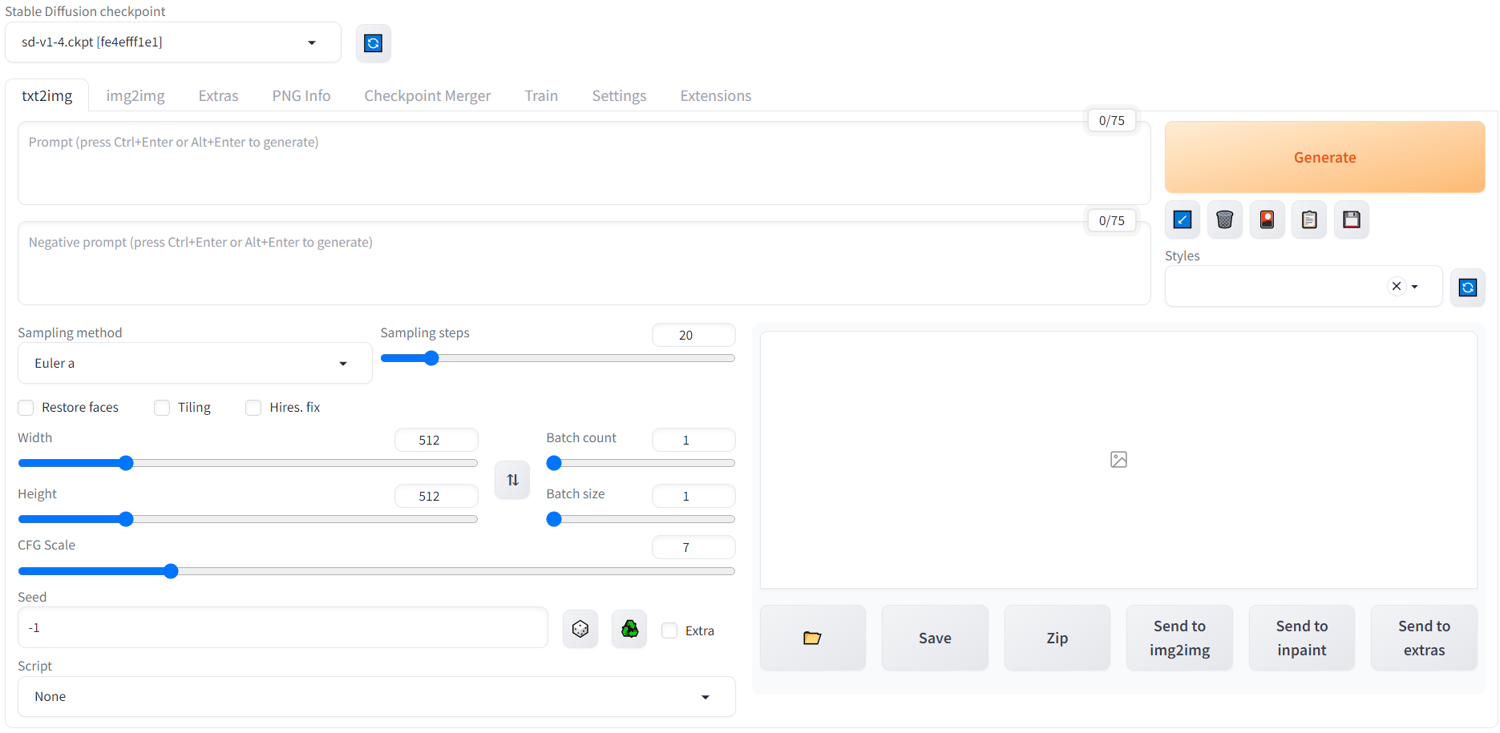
- Hit Enter to open the SD AI webUI.
Now, you need to enter your text prompt inside the txt2img prompts field. Hit Generate, and you get the generative image you need. For example, I entered the following prompt:
create an image of a windows 11 pc on a desk

Find below the result:

Whenever you must run Stable Diffusion AI, you need to execute the webui-user.bat file.
How to Run Stable Diffusion AI on Mac
You can follow the same approach on a Mac to run SD AI locally. However, there is a macOS app you can use to run SD AI rather than doing all the steps you did on a Windows 11 or 10 PC. This is the DiffusionBee app.
Mac Requirements
If you want to run the SD AI on a Mac, the followings are the recommended hardware configurations:
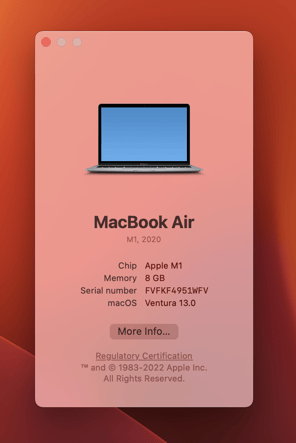
- macOS Monetery (macOS 12.5.1) or a better operating system
- Apple Silicon Mac with M1 or M2 chip
- 8GB unified memory or better
- 8GB or more free space on the internal drive for AI models and other file processing
You can also use an Intel-based Mac, but you might experience slower processing speed.
Download and Install DiffusionBee
Find below the step-by-step guide to download and run DiffusionBee on your Mac:
- Open the Safari browser and visit the DiffusionBeed download portal.
- You should see two download options: macOS Apple Silicon and macOS Intel 64-Bit.
- Choose the download option according to your Macbook or iMac’s configuration.
- On the Allow Downloads notification, click Allow.
- Once the download is complete, click the Download icon on Safari.
- Double-click the DiffusionBee file on the Downloads folder to open the installation interface.

- Move the DiffusionBee icon from the left to the Applications folder on the right.

- Click Open on the warning pop-up.
- DiffusionBee will launch and start downloading the required packages and files.

Once the downloading is complete, you can start using SD AI on DiffusionBee, just like any other app you use on your Mac. This is a one-time process and needs internet connectivity. Once you prime the DiffusionBee app with the required packages, you can run it offline.
Run Stable Diffusion AI Via DiffusionBee
When the DiffusionBee is primed to accept Text to Image or Image to Image prompts, you will see the following window:

Click the Text to Image tab and enter your prompt within the prompt box. For example, I ran this prompt:
Create an image of a cat lying around on a keyboard

Click the Options button to modify the output image by changing the values for the following:
- Number of images
- Resolution
- Seed
- Steps
- Sampler
- and many other options
Once done optimizing the generative AI model, click the Generate button. You should see a Generating progress bar. When it finishes, you shall get an image something like the one below:

Alternatively, you can supply the AI image generator with a training image. Then, enter prompts to modify the image the way you want. Hit the Generate button to get a creative masterpiece from Stable Diffusion AI. The resulting image is completely different than the input, so there will not be any copyright conflict if you publish or monetize the generative image.

Final Words
Now you know how to run Stable Diffusion AI locally on a Windows PC or Mac. You can use this advanced generative AI model to produce stunning images for your projects. These days it is challenging to find royalty-free stock or vector images for your publishing work.
To overcome this challenge, you can use Stable Diffusion freely. You do not need to give credit to anyone if you use the produced image personally or commercially. If you are a creative image designer, you can save a lot of money by avoiding expensive subscriptions to Stable Diffusion web apps.
Next up, MidJourney vs. Stable Diffusion vs. Bing Image Creator
-
 Tamal DasAuthorTamal is a freelance writer at Geekflare. After completing his MS in Science, he joined reputed IT consultancy companies to acquire hands-on knowledge of IT technologies and business management. Now, he’s a professional freelance content… read more
 -
Rashmi SharmaEditor
Rashmi has over 7 years of expertise in content management, SEO, and data research, making her a highly experienced professional. She has a solid academic background and has done her bachelor’s and master’s degree in computer applications…. read more