How to Monitor Port and Website with Open Source?

Application uptime is crucial for business operation, and as Infrastructure support, you must be equipped with the required monitoring tool for proactive action.
If you are working in a large organization, then most probably you will have some enterprise tool, which you are obliged to use it.
However, for small to medium businesses – you may think of having Open Source as a free solution for Web URL & Ports monitoring.
In this article, I will talk about how to monitor URL and Service Ports with an Open Source tool based on PHP – PHP Server Monitor.
Some of the monitoring possibilities
- Monitor Web URL
- Monitor Port number
- Search for a string on website and markdown if not found
- Option to try for configured threshold before alerting
- Define response timeout value
- Get notified through email, SMS, Jabber, Telegram, Pushover
Pre-requisite
- Web Server – Apache, Nginx (I will consider Apache for this demo)
- PHP 5.5.9+ or PHP 7.0.8+
- PHP-MySQL
- MySQL
- CURL
If you already have a pre-requisite on your server, including Database, then you may jump to the “Install PHP Server Monitor” section below.
Install Apache, PHP, MySQL, CURL
- Login into a server where you intend to set up the monitoring
- Open the SSH Terminal
- Execute below yum command to install
yum install httpd php mysql-server curl php-mysql
- Start Apache & MySQL services
service mysqld start
service httpd start
Setup Database
It requires a database to store the monitoring matrix. Let’s start setting up MySQL by creating a database, user & password. If it’s fresh MySQL installation, then it’s recommended to go through securing procedure by executing
/usr/bin/mysql_secure_installation
- Follow the instruction on the screen. Actually, you can have Y for all.
- Restart MySQL service
It’s time to create the database and grant the privileges.
[root@Chandan yum.repos.d]# mysql -u root -p
Enter password:
Welcome to the MySQL monitor. Commands end with ; or g.
Your MySQL connection id is 2
Server version: 5.1.73 Source distribution
Copyright (c) 2000, 2013, Oracle and/or its affiliates. All rights reserved.
Oracle is a registered trademark of Oracle Corporation and/or its
affiliates. Other names may be trademarks of their respective owners.
Type 'help;' or 'h' for help. Type 'c' to clear the current input statement.
mysql> create database CHANDAN;
Query OK, 1 row affected (0.00 sec)
mysql> create user CHANDAN@localhost;
Query OK, 0 rows affected (0.00 sec)
mysql> set password for CHANDAN@localhost=PASSWORD("CHANDAN");
Query OK, 0 rows affected (0.00 sec)
mysql> grant all privileges on CHANDAN.* to CHANDAN@localhost identified by 'CHANDAN';
Query OK, 0 rows affected (0.00 sec)
mysql> flush privileges;
Query OK, 0 rows affected (0.00 sec)
mysql> exit
Bye
[root@Chandan yum.repos.d]#
For demo purposes, I have kept username, password & database as “CHANDAN”. Please change it accordingly.
Install PHP Server Monitor
You may create a new folder “monitoring” under /opt to keep the tool package.
- cd /opt
- mkdir monitoring
- cd monitoring
- Download the latest version from here
Or you can directly pull the zip file from the server using wget command
- unzip the downloaded zip file
unzip phpservermon-3.1.1.zip
- Copy the extracted folder to your Apache DocumentRoot. If installed at default location then it would be /var/www/html
cp –rp phpservermon-3.1.1 /var/www/html
- Let’s rename the folder from phpservermon-3.1.1 to monitoring (this is optional though)
mv phpservermon-3.1.1 monitoring
Let’s begin installation by accessing a web server URL with monitoring URI. If you were doing on localhost, then it would be http://localhost/monitoring/install.php
- Click on “Let’s go.”

- Enter the database information
- Click on “Save configuration.”

- Enter user details to create an account for Monitor Administration
- Click on “Install”

- It will take a few seconds, and you will see “SUCCESS” confirmation.

Great, so now your “PHP Server Monitor” setup is done, and it’s time to configure some monitoring.
- Click on “Go to your monitor.”
- Enter the username and password and click on “Login.”

You will be redirected to the “Status” page, where you will see pre-defined two monitoring. Don’t worry – you can delete them.

- Let’s set up a URL monitoring. Click on “Servers” menu on the top
- Click on “Add new”
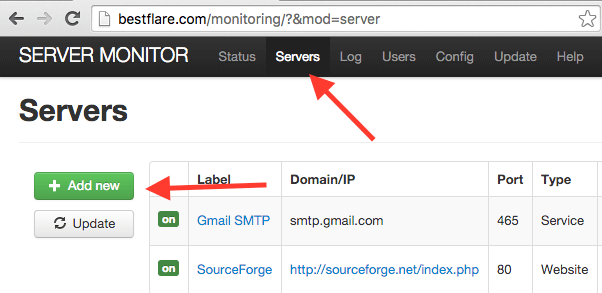
- Enter the required information and click on “Save.”

- You will notice that newly added monitoring is displayed under the “Status” page.

Configure cronjob
To have status updated periodically, cronjob must be running. You can run them every 5 minutes or whatever suits you. You may refer my article on setting up a crontab if not sure.
*/05 * * * * root /usr/bin/php /var/www/html/monitoring/cron/status.cron.php
This great tool also gives you Latency (average) and uptime report in a graph by an hour, day, or week.
- Go to Status and click on the desired label.

Go ahead and add some monitoring to get notified when something goes down. Alternatively, you may try a cloud-based monitoring solution for your websites.
-
 Chandan KumarAuthorAs the founder of Geekflare, I’ve helped millions to excel in the digital realm. Passionate about technology, I’m on a mission to explore the world and amplify growth for professionals and businesses alike.